

If you’re looking for an honest ClickMagick review…
You’re in the right place!
Because in this post, I give an honest review of ClickMagick so you can see if it’s right for you.
Furthermore:
The review comes from someone who actually uses ClickMagick currently.
You ready?
Let’s dive in…
Affiliate Disclosure: Some of the links on this site are affiliate links. If you click on one and buy something, I may get a commission at no extra cost to you. Go here to read the full disclosure.
CickMagick Review (2024 Edition)
So, What Is ClickMagick Exactly?
ClickMagick is “link tracking software.”
It’s used to track clicks & conversions to your links, ads, or funnels.
When you’re marketing, there are certain things you need to know.
Like:
- You need to know where your traffic is coming from.
- Whether that traffic is actual human beings. (Could be servers or bots.)
- If you use sales funnels, you’ll want to track EVERYTHING that happens within your funnels. (Opt-ins, sales, conversions from emails etc.)
- And if you run paid ads, you’ll want to know your CPL, CPS & ROI metrics. (Cost per lead/Cost per sale/Return on investment.)
That’s what ClickMagick does.
It makes it easy to track all of your marketing, in one place, so you can optimize & scale your business based on actionable data.
Who Should Use ClickMagick?
ClickMagick should be used by anyone that wants accurate data from their marketing efforts.
If you’re an affiliate marketer, blogger, solopreneur, or business owner of any kind & you want data you can rely on, then ClickMagick is for you.
Top 9 Features Of ClickMagick
1: Create Tracking Links Quickly & Easily
Creating tracking links in ClickMagick is easy as 1-2-3.
Click the + New Link button within the dashboard, add the link you want tracked into the Primary URL section, give your link a slug & name (optional) & that’s it:
Here’s an example of what a tracking link looks like inside of ClickMagick.
This is one of my affiliate links from my own ClickMagick account:
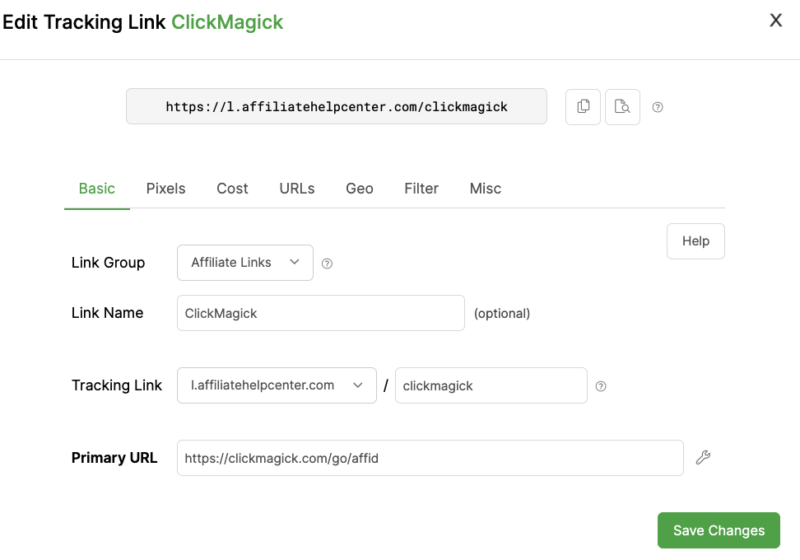
And here’s a quick run down of the different settings you’ll see when creating a tracking link:
- Link Group: You can group tracking links together so all your links are “segmented.”
- Link Name: The name of your tracking link.
- Tracking Link: This will be the domain & slug of your tracking link once created. (You can set up a custom domain, or use ClickMagick’s default domain.)
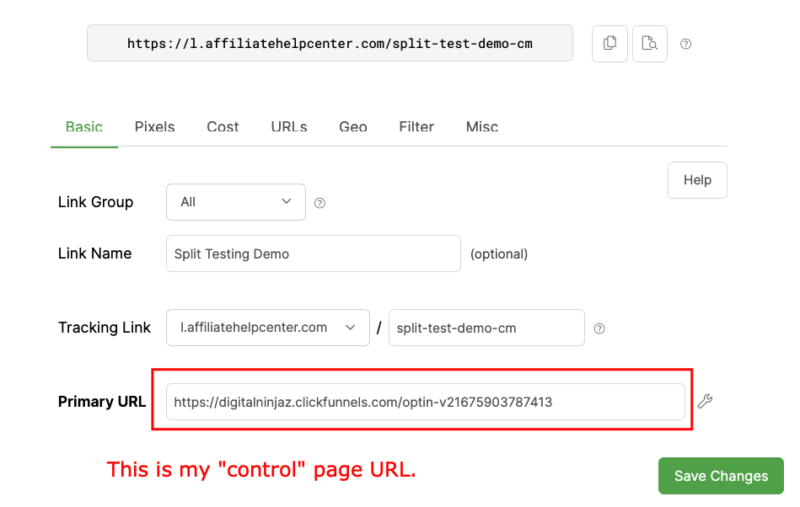
- Primary URL: The URL of the link you want tracked. In the example above, it’s my ClickMagick affiliate link.
The link at the very top of the window is the tracking link i.e the link you’ll share online.
Every single click to that tracking link is tracked (with laser like accuracy) & recorded within the ClickMagick dashboard.
2: Easy To View Stats
The stats you see depend on what you want tracked.
For example:
You may only want to track clicks with some of your links, but clicks & conversions with others.
Here’s an example of some of the stats you’ll see:
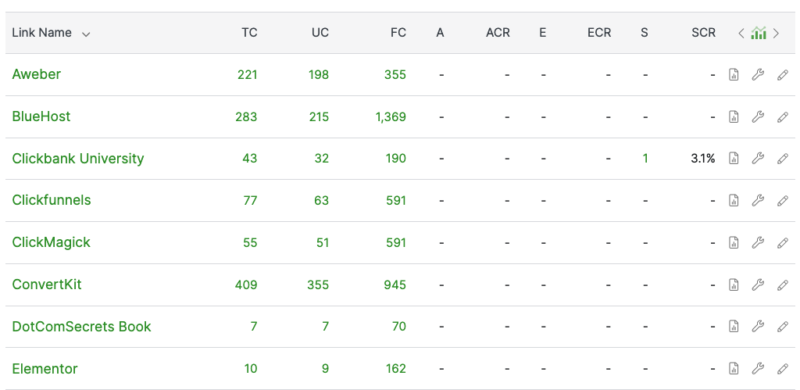
And here’s an overview of what the different abbreviations mean:
- TC (Total Clicks) – Total number of clicks your tracking link has received.
- UC (Unique Clicks) – Total number of unique clicks to your tracking link. If the same person clicks 5 times, that’s 5 total clicks, but only 1 unique click.
- FC (Flagged Clicks) – These are clicks from online servers & bots.
- A (Action) – For when you want to track an “action” such as an optin.
- ACR (Action Conversion Rate) – This is the number of unique actions divided by the number of unique clicks i.e your optin conversion rate.
- E (Engagements) – You can use this to track anything such as “lands on a sales page” etc. This is mainly used within sales funnels.
- ECR (Engagement Conversion Rate) – This is the number of unique engagements divided by the number of unique clicks.
- S (Sales) – The total number of sales.
- SCR (Sales Conversion Rates) – This is the number of unique sales divided by unique clicks.
It may seem a bit overwhelming at first glance, but it’s actually very simple.
And for the most part, you’ll generally just start with the number of unique clicks you get, as well as how many optins and/or sales.
If you want to go full blown “tracking mode,” then it’s best to start small, understand what you’re looking at, then increase what you’re tracking over time.
For me as an affiliate, I mainly track clicks to my affiliate links & where possible, affiliate sales.
3: Track Multiple Sources Of Traffic With Sub ID's
You can use 1 tracking link all over the internet & know (exactly) the different sources driving clicks & sales.
For example:
You may write 10 different blog posts on 10 different websites & create 10 different emails to promote a specific product.
You can use just the 1 tracking link to track all these different traffic sources by using “Sub IDs.”
In ClickMagick, tracking links look like this:
https://l.affiliatehelpcenter.com/clickmagick
A Sub ID is like an identifier that you can add to the end of your tracking link. (After the /clickmagick part in the example above.)
For example:
You may want to add an identifier of blog-post-1.
Simply add a forward slash after the slug, then your identifier. (Sub ID.)
Like this:
https://l.affiliatehelpcenter.com/clickmagick/blog-post-1
You can take that same tracking link, then use another Sub ID when you add your link to a different source/blog post/site.
Like this:
https://l.affiliatehelpcenter.com/clickmagick/blog-post-2
ClickMagick allows up to 5 sub ID’s.
You can add different Sub ID’s by adding a forward slash after each Sub ID.
Like so:
https://l.affiliatehelpcenter.com/clickmagick/blog-post-2/ryans-blog/june-5
Or like this:
https://l.affiliatehelpcenter.com/clickmagick/freds-blog/top-banner/yellow
Here’s an example of using Sub ID’s from my own ClickMagick account:
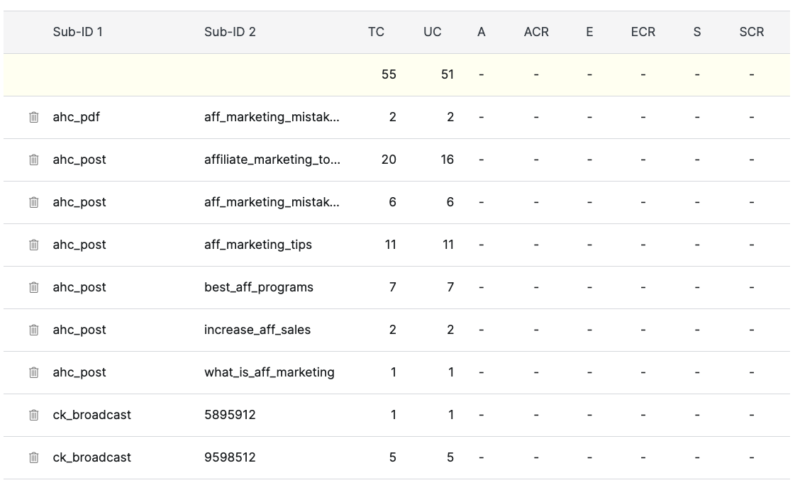
The Sub-ID 1 column tells me where the clicks came from i.e from one of my blog posts, a PDF, or an email broadcast.
And the Sub-ID 2 column tells me which blog post, PDF, or email generated the clicks.
4: See The Quality Of Your Traffic
No matter what traffic sources you’re using, it’s good to keep an eye on the “quality” of your traffic.
Traffic quality is determined by where in the world the traffic is coming from & the unique number of clicks you’re getting.
Traffic quality is especially important if you buy solo ads.
Many solo ad sellers will claim they’ll send you “tier 1” traffic.
Meaning, traffic from English first speaking countries like U.S.A, Canada, United Kingdom, Australia, New Zealand. (The best kind of traffic.)
With ClickMagick, you’ll know whether you’re getting “tier 1”, “tier 2”, or “tier 3” traffic.
As shown here:
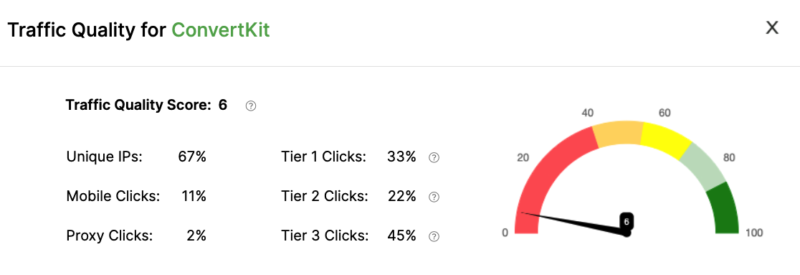
This is traffic from Google to one of my affiliate links.
As you can see, most of the traffic is “tier 3 traffic.” (45%)
This is lower quality traffic from countries where English is not their first language.
5: A/B Split Testing
Split testing is a must if you want to increase conversions.
And with ClickMagick, setting up a split test is quick & easy.
Here’s how it works when creating a split test for your opt-in pages…
Step 1: Create a tracking link for your control page:
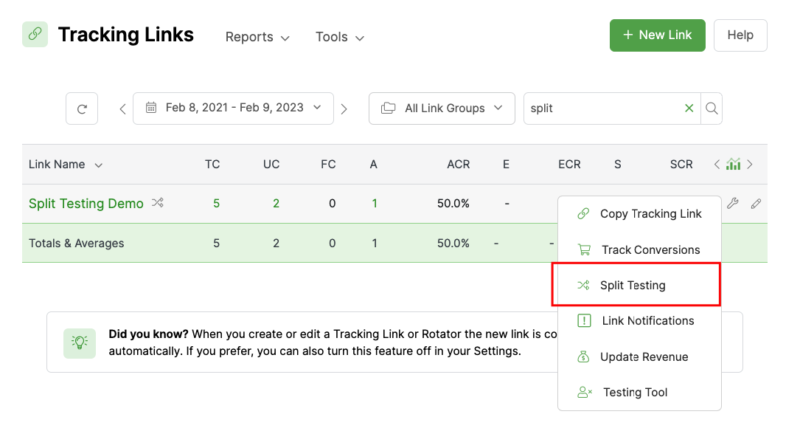
Step 2: Click on the Split Testing tab within the ClickMagick dashboard:
Step 3: Add in your variation URLs & choose the percentage of traffic you’d like to each page:

Step 4: Use ClickMagick’s “pixel builder” to create a tracking pixel.
This pixel get’s added to your “thank you page” so all opt-ins are tracked when a user lands on that page:
Once you start getting traffic, the traffic will be split across all the pages in your split test.
ClickMagick will then show how many clicks you’re getting & how many of those clicks are converting into leads:
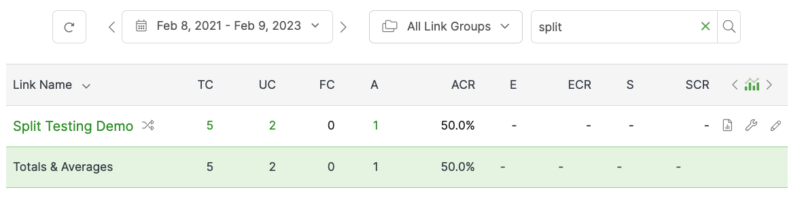
The UC column shows how many unique clicks you’ve received, the A column will show the number of actions (opt-ins) & the ACR is your conversion rate.
You’ll also be able to see which pages in your split tests are converting the best.
6: Filter Out Fake Clicks From Real Clicks
Not all clicks to your links are from human beings.
You’ll often find many of the clicks you do get are actually from “bots” or “servers.”
And most apps will show those clicks as regular clicks, when in fact, they’re not actual click.
ClickMagick uses “click technology” to determine whether your clicks are from humans, bots or servers.
And if they’re from bots or servers, ClickMagick will count the click, but the clicks will be flagged.
When looking at your stats, you’ll see all your flagged clicks under the FC column:

By flagging these types of clicks, it ensures the data you see is accurate.
ClickMagick will flag bots & servers automatically.
7: Automatic Link Monitoring
ClickMagick monitors all the links you’re tracking within your account.
If you receive more than 10 clicks to a non-existent link within a 24 hour period, ClickMagick will notify you via email:
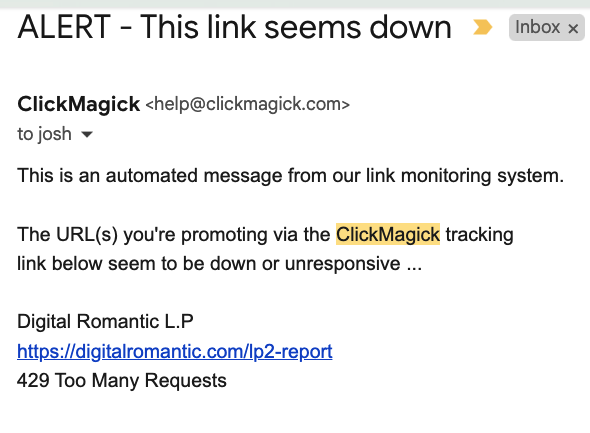
I’ve had multiple funnels of mine go down without me knowing.
But thanks to ClickMagick’s link monitoring system, I was notified & was able to rectify the problem.
8: Manage All Your Links In One Place
In January of 2022 I was sent this email from Elementor, one of the services I’m an affiliate for:
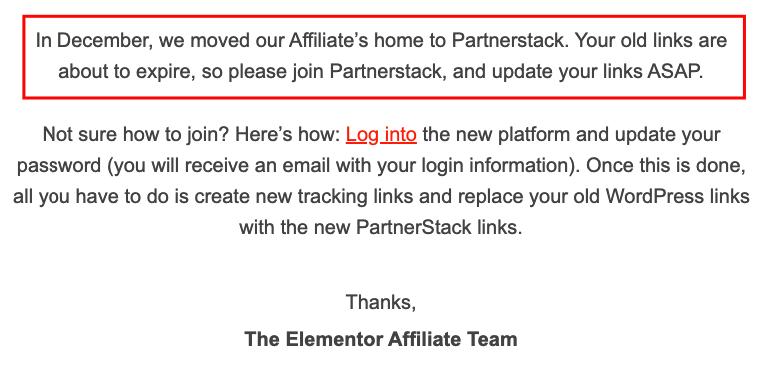
The email states they’re about to change their affiliate management system & that my current Elementor affiliate link will expire.
This is a MAJOR problem!
Why?
Because I’ve shared (posted) my affiliate link ALL over the place!
In fact:
I’ve posted my affiliate link in so many different places, I have no idea where they all are.
Therefore, I’d have non-working affiliate links scattered all over the internet.
Thank goodness for ClickMagick though.
Rather than share my raw affiliate link, I created a tracking link for it as shown here:
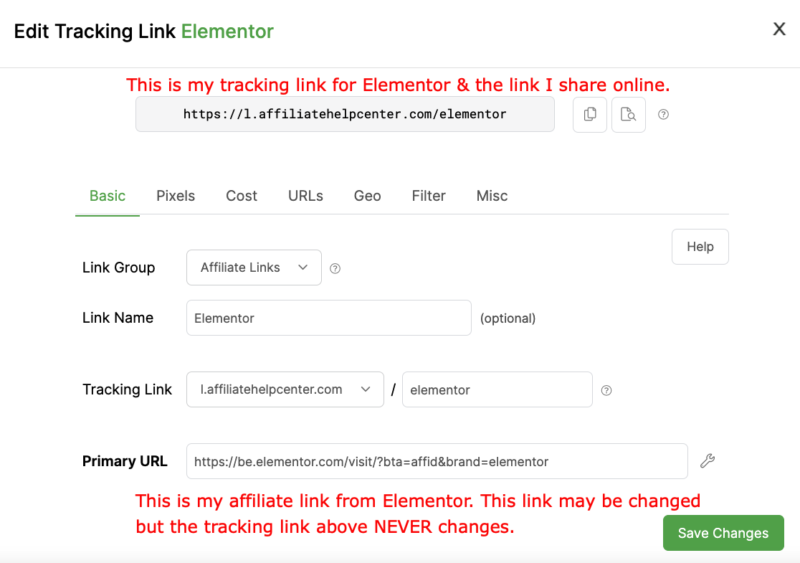
That tracking link is then shared & not my raw affiliate link.
In ClickMagick, tracking links redirect to the URL you place in the “Primary URL” section.
In my case, that’s my Elementor affiliate link.
While my affiliate link may change or stop working etc, the tracking link NEVER changes.
So when Elementor reached out about my affiliate link about to expire, I just changed the URL in the “Primary URL” section to my new affiliate link. (Took 5 seconds.)
And since my actual tracking link never changed & that’s the link I always use/share, my affiliate link was updated instantly, no matter where online I’d posted it.
Awesome… 😊
9: Easy To Use Rotators
A “rotator” is a click delivery tool that takes incoming clicks & sends them to one or more URLs based on the type of rotator it is.
Here’s what a rotator looks like within ClickMagick:
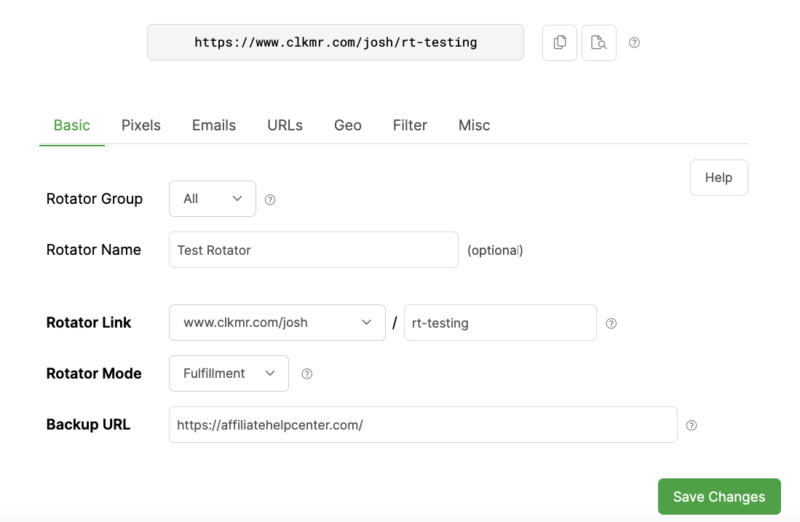
There are 4 different rotator modes to choose from:
1: Fulfillment – Fulfillemt mode will send all traffic to the first active URL in the rotator, including repeat clicks from the same user.
2: Spillover – Spillover mode will send traffic to each URL in the rotator, one after the other.
3: Random – Random mode will distribute clicks randomly to all active URLs in the rotator.
4: Sequential – Sequential mode will send incoming clicks to each rotator URL in order, then start over again when it gets to the last URL.
Rotators are mainly used by solo ad sellers.
ClickMagick Pricing
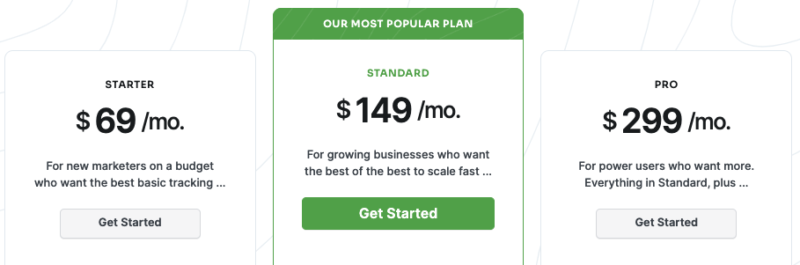
They offer a 14 day free trial with each plan too.
So you can take the software for a “test drive” to see if it’s right for you.
Pros & Cons Of ClickMagick
Pros:
- Easy to use & set up tracking links
- Laser like accuracy (ClickMagick is VERY accurate with stats & reporting)
- A/B split testing
- Automatic link monitoring
- Works with all ad platforms & apps (Plus a Zapier integration)
- World class bot filtering
- Click fraud protection
- Cross device tracking
- Track phone & offline sales (Whaaat?!)
- Integration with 100+ affiliate networks
- Awesome support team with live chat & phone support
- 14 day free trial with all plans
Cons
- It can become overwhelming because there's so many different features
- The displaying of stats could be a little nicer/cleaner
ClickMagick Review: Final Thoughts
Well, that wraps up this ClickMagick review.
Is ClickMagick worth it?
Absolutely!
I signed up for ClickMagick back in 2015 & I’ve used it ever since.
And I can honestly say, I’ve never been let down, or disappointed with the platform.
It’s insanely accurate, easy to use & it just works.
I use it mainly for affiliate marketing & the tracking of all my affiliate links.
Ready to try ClickMagick for yourself?
Click the button below right now and sign up for a 14 day free trial…
![7 Best Web Hosting Companies For Affiliate Marketing [2024]](https://ahc-1cde4.kxcdn.com/wp-content/uploads/2024/02/Best-web-hosting-companies-for-affiliate-marketing-2-1-300x220.png)